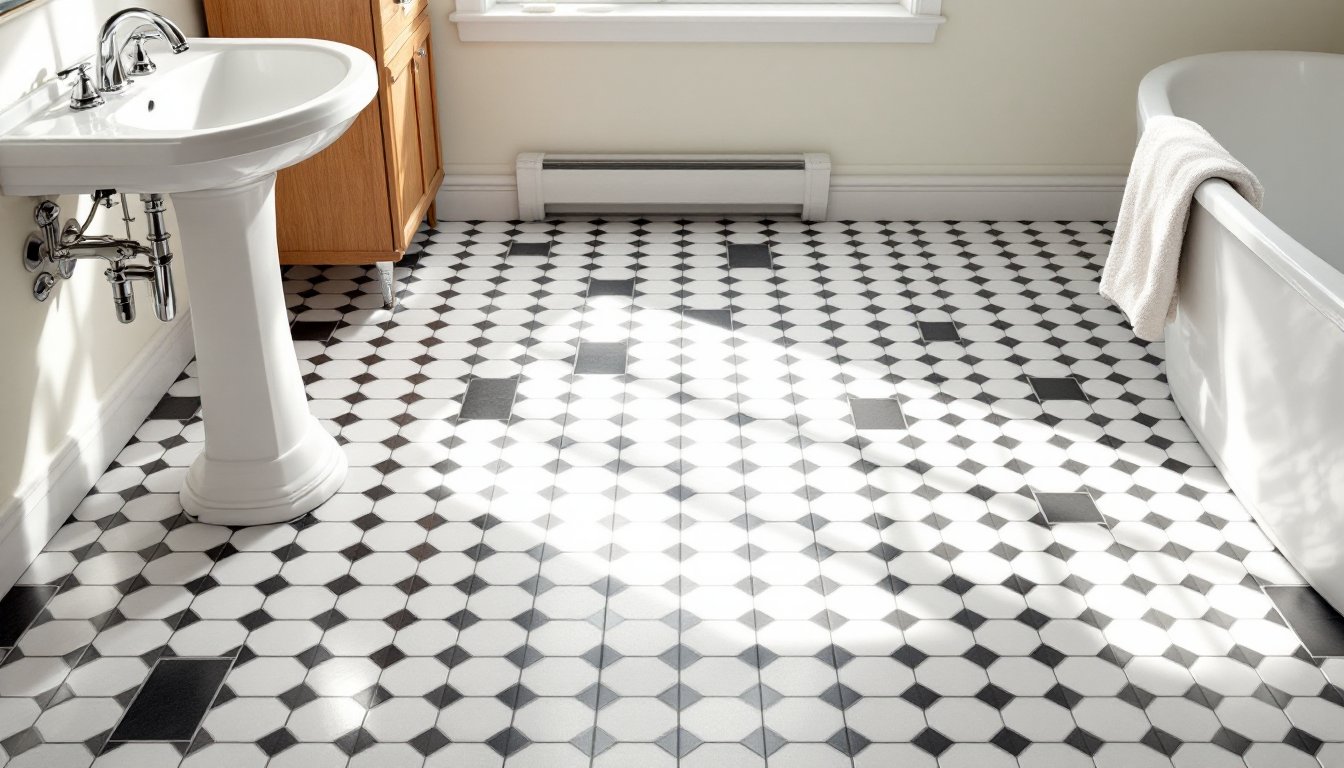
Black and white bathroom floor tile remains one of the most versatile choices for any remodel, whether you’re updating a powder room or tackling a full primary bath gut job. The high-contrast palette works across design styles, from vintage-inspired to sleek modern, and it won’t look dated in five years. Beyond aesthetics, the color combination hides minor grout staining better than all-white installations while still feeling clean and bright. This guide covers pattern options, material selection, installation considerations, and maintenance tips to help homeowners plan a successful tile project.
Table of Contents
ToggleKey Takeaways
- Black and white bathroom floor tile offers timeless design versatility that works across styles from vintage to modern and hides grout staining better than single-color alternatives.
- Popular patterns for black and white tile include checkerboard, hexagon mosaics, herringbone, and geometric designs—choose based on room size and visual preference to avoid overwhelming tight spaces.
- Porcelain tile rated PEI 3+ with slip resistance (DCOF 0.42+) is ideal for bathroom floors, though ceramic offers a budget-friendly option for low-traffic powder rooms.
- Proper subfloor preparation with cement board underlayment and accurate layout lines are critical to prevent cracking; allow thinset 24–48 hours to cure before grouting.
- Seal grout lines every 12–18 months, use pH-neutral cleaners, and perform annual inspections of caulk joints to prevent water damage and maintain your black and white bathroom floor tile investment.
Why Black and White Floor Tiles Never Go Out of Style
The staying power of black and white tile comes down to contrast and flexibility. High-contrast flooring anchors a bathroom visually, allowing walls, vanities, and fixtures to shift over time without requiring a floor replacement. You can swap out brushed nickel for matte black hardware, repaint from gray to sage, or replace a white pedestal sink with a wood vanity, and the floor still works.
From a practical standpoint, black and white tile disguises wear better than solid light colors. Light grout lines on white tile show every speck of dirt: all-black floors highlight soap scum and water spots. The mix balances both issues. A black tile with white grout or a patterned layout camouflages the everyday grime that accumulates in a high-moisture environment.
Historically, black and white tile has appeared in American bathrooms since the early 1900s. Victorian-era hex mosaics, Art Deco checkerboards, and mid-century modern geometric patterns all used this palette. That long track record means the look reads as classic rather than trendy, which protects your investment if you plan to sell within a few years.
Designers continue to lean on black and white patterns because the floor becomes a neutral backdrop or a bold focal point depending on scale and layout. Small-format mosaics create texture without overwhelming a tight space, while large-format checkerboard tiles make a strong graphic statement in a spacious master bath.
Popular Black and White Tile Patterns to Consider
Checkerboard: Classic and Bold
Checkerboard layouts use square tiles in alternating black and white. Standard sizes range from 6″×6″ to 12″×12″, though 9″×9″ is common for residential bathrooms. Larger squares (12″×12″ or even 18″×18″) suit bigger rooms and reduce grout line maintenance: smaller squares (4″×4″ to 6″×6″) fit well in vintage or cottage-style spaces.
Installation is straightforward: tiles align on a grid with consistent grout joints, typically 1/8″ to 1/4″ wide. Many DIYers choose checkerboard for a first tile project because there are no complex cuts or pattern matching, just straight rows. Keep in mind that any layout error compounds quickly, so accurate starter lines and frequent level checks are essential.
One design variation is a diagonal checkerboard, where tiles run at 45° to the walls. This adds visual interest and can make a narrow room feel wider, but it increases waste (plan for 15–20% extra material) and requires more perimeter cuts. Use a wet saw or angle grinder with a diamond blade for clean edges on porcelain or ceramic tile.
Hexagon and Geometric Designs
Hexagon tile (often called hex tile) typically comes in 1″, 2″, or 3″ sizes for mosaics or larger 6″–8″ formats for a modern look. Small hex mosaics are sold on 12″×12″ mesh-backed sheets, which speed up installation and help maintain consistent spacing. Black and white hex patterns range from random mixes to structured designs like花朵 flowers or honeycomb clusters.
Geometric patterns extend beyond hexagons. Basket weave pairs rectangular tiles in a woven appearance, herringbone arranges rectangles in a zigzag, and Moroccan-inspired encaustic patterns use shaped tiles to create intricate motifs. Many of these are available as printed porcelain that mimics traditional cement tile without the sealing and maintenance requirements.
When selecting a geometric design, request sample sheets and lay them out in your bathroom before committing. What looks balanced on a showroom wall can feel busy on a floor, especially in a small powder room. Professionals often recommend keeping busy patterns on the floor and leaving walls solid or with minimal accent tile to avoid visual overload.
Choosing the Right Tile Material and Finish
Bathroom floors need tile rated for wet environments. Look for a PEI (Porcelain Enamel Institute) rating of 3 or higher for residential floor use and a slip resistance rating (often expressed as DCOF, or Dynamic Coefficient of Friction) of at least 0.42 for wet areas. Glazed porcelain and ceramic are the most common choices, but natural stone, encaustic cement, and luxury vinyl tile (LVT) are also options.
Porcelain tile is denser and less porous than ceramic, making it more resistant to moisture and staining. It’s a good fit for bathrooms with heavy use or poor ventilation. Full-body porcelain (where color runs through the entire tile) hides chips better than surface-glazed versions. Expect to pay $3–$8 per square foot for mid-grade porcelain, not including installation.
Ceramic tile costs less, often $1–$4 per square foot, and works well in powder rooms or guest baths with lighter traffic. It’s slightly more prone to cracking under impact, so handle it carefully during installation and avoid dropping heavy objects once it’s in place.
Natural stone like marble or slate delivers a high-end look but requires sealing and ongoing maintenance. Honed (matte) finishes offer better slip resistance than polished stone, which can be hazardous when wet. Stone tile typically runs $8–$20+ per square foot and often needs professional installation due to variations in thickness and the need for proper underlayment.
Finish matters as much as material. Glossy tiles reflect light and make small bathrooms feel larger, but they show water spots and can be slippery. Matte and textured finishes hide grime and provide better traction. Many homeowners mixing bathroom remodel inspiration into their projects opt for matte black and glossy white tiles to add subtle depth to the pattern.
Installation Tips for DIY Homeowners
Before laying a single tile, verify that your subfloor is sound. Bathroom floors typically have a 3/4″ plywood subfloor topped with 1/2″ cement board (like HardieBacker or Durock) for moisture resistance and rigidity. The total deflection under load should not exceed L/360 per IRC guidelines, if the floor feels bouncy, reinforce joists or add blocking before tile goes down. Tile installed over a flexing subfloor will crack grout and eventually break.
Prep steps:
- Remove old flooring, baseboards, and the toilet. Cap the toilet flange temporarily.
- Check subfloor for level using a 4′ or 6′ level. Sand down high spots: fill low areas with floor leveling compound if the variance exceeds 1/4″ over 10′.
- Install cement board with corrosion-resistant screws every 6″–8″ and tape seams with alkali-resistant mesh and thinset.
- Allow thinset under cement board to cure 24 hours before tiling.
Layout and installation:
• Snap chalk lines to establish perpendicular working lines. For a centered checkerboard, start at the room’s midpoint: for geometric patterns, dry-lay tiles first to minimize awkward cuts at walls.
• Use modified thinset mortar for cement board and most porcelain/ceramic tiles. Spread with a 1/4″ × 1/4″ square-notch trowel for tiles up to 8″: switch to 1/4″ × 3/8″ for larger formats.
• Back-butter tiles larger than 8″×8″ to ensure full coverage and prevent voids that can crack under point loads.
• Insert tile spacers (1/8″ or 3/16″) for consistent grout joints. Remove spacers before thinset skins over (usually within an hour).
Safety and tools:
Wear kneepads, safety glasses, and a dust mask when cutting tile. A wet saw is the cleanest option for straight cuts: rent one for around $50/day if you don’t own one. For curved cuts around toilet flanges or pipes, use a tile nipper or an angle grinder with a diamond blade. Keep a bucket of water and sponge nearby to wipe excess thinset before it hardens.
Allow thinset to cure 24–48 hours before grouting. Use unsanded grout for joints under 1/8″ (common with mosaics) and sanded grout for wider joints. Epoxy grout resists staining better than standard cement grout but costs more and is harder to work with, consider it for white grout in high-traffic or poorly ventilated baths.
Grout application takes practice. Work in small sections, pressing grout into joints with a rubber float held at 45°. Wipe diagonally across tiles with a damp sponge to avoid pulling grout out of joints. After 24 hours, buff off any haze with a dry microfiber cloth and apply grout sealer per manufacturer instructions.
Maintenance and Cleaning Best Practices
Black and white tile is relatively low-maintenance, but grout requires attention. Seal grout lines with a penetrating sealer every 12–18 months to prevent staining and moisture infiltration. Epoxy grout and urethane grout don’t need sealing, but they cost significantly more upfront.
For routine cleaning, sweep or vacuum loose dirt before mopping. Use a pH-neutral tile cleaner, acidic cleaners (like vinegar) can etch natural stone and degrade grout over time, while alkaline cleaners leave a film on glazed tile. A simple mix of warm water and a few drops of dish soap works for most messes. Homeowners researching interior design ideas often overlook cleaning product compatibility, which can dull a beautiful floor.
Avoid steam mops on natural stone or any tile with unsealed grout: the heat and moisture can loosen grout and damage sealant. For stubborn grout stains, use a grout brush (or an old toothbrush) with oxygenated bleach cleaner rather than chlorine bleach, which can discolor colored grout.
Black tile shows water spots and soap residue more than white, so squeegee or towel-dry the floor after showers if you want to keep it looking pristine. White grout in high-traffic areas may gray over time even though sealing, plan for a grout refresh (re-grouting or applying a grout colorant) every 5–7 years depending on use.
Inspect caulk joints where tile meets the tub, shower pan, or wall annually. Cracked or missing caulk allows water behind the tile, leading to subfloor rot and mold. Remove old caulk with a utility knife, clean the joint with rubbing alcohol, and apply fresh 100% silicone caulk rated for kitchens and baths. This small maintenance step prevents costly water damage and keeps the installation watertight.
Finally, address chips or cracks promptly. A small chip in glazed tile can admit water and expand with freeze-thaw cycles (if the bathroom is in an unconditioned space) or simply collect grime. Tile repair kits with epoxy filler are available for minor cosmetic fixes, but significant damage usually means replacing the tile. Keep a few spare tiles from your original order for future repairs, dye lots vary, and discontinued patterns are hard to match.